THE ONE TECHNIQUE OR TOOL THAT I CANNOT LIVE WITHOUT IS…

I think right now that would be my sewing machine or my computer… or perhaps my camera. I pretty much use them all equally but for different purposes.
THE ONE TECHNIQUE OR TOOL THAT I CANNOT LIVE WITHOUT IS…
I think right now that would be my sewing machine or my computer… or perhaps my camera. I pretty much use them all equally but for different purposes.
Continuing with Seth’s Questions from the Pulse: ONE ARTIST THAT INSPIRES ME IS…
Currently I think I would have to say that Jen Worden inspires me the most right now for several reasons.
1) She hosts challenges. over the past several years she has hosted different challenges in different places and I always give them a try. They help keep me going to my studio and making stuff!
two) She also is a triathlete, something that I am aspiring to myself.
III) She makes the coolest stuff that is way different from mine and is part of a design team. (I am not really sure what a design team is… but it sounds cool)
Seth from the Altered Page has gathered some of my favorite online artists and asked them some questions about their art and their process, figuratively taking The Pulse of the online arts community. So far he has done this twice, each time posing different questions to different artists. Today I noticed that he was preparing for another round of the game. I quickly emailed him and asked to play along. I was tickled when he invited me to play and said, “I have been to your blog many times and love the work you do — so much variety in so many media.”Â
While he prepares for the August edition of The Pulse, and I gather my thoughts on the current round of questions, he is sharing a walk though memory lane by reviewing past answers. I thought it would be fun to consider some of these questions for myself as well. I have been searching for a little bit of direction and inspiration these days, so why not? (click on the question if you want to see what other artists, like my friends Bridgette Guerzon Mills,  Jen Worden and Teesha Moore had to say on the subjects.)
IF I COULD TAKE A CLASS FROM ONE ARTIST FROM ANYTIME IN HISTORY, INCLUDING TODAY, IT WOULD BE… One of the great things about being a teacher is that I have to do professional development all the time. I am literally required to take classes. Although most of these have to be educationally related, I purposefully include art classes as well. So over the years I have taken many fun classes from people like Michael DeMeng, and attended lectures by the likes of Nick Bantock. I think that if I could reach back in time Dali would be a top choice. He is so insane! and he also did artwork in a variety of mediums including film and photography (two of my favorites!) I would also like to learn really wonderful swirls and patterns from Klimt. Of living artists I really want to experience working with Anahata Katkin and Traci Bautista.
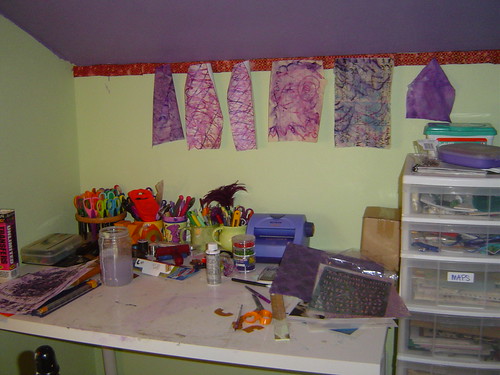
5 THINGS ON MY STUDIO TABLE RIGHT NOW INCLUDE… Besides being a BIG mess that needs cleaning once again, my collage table hasn’t seen much use lately, which is why it needs cleaning. It currently has, among other things, some new scissors, three mugs full of special edge scissors, an old map to cover the surface and protect it from paint stains…which then will be used as a background of something eventually, some special golden acrylic texture bases that I should use or give to my friend Amy who would actually use them and my Artfest 2008 button.

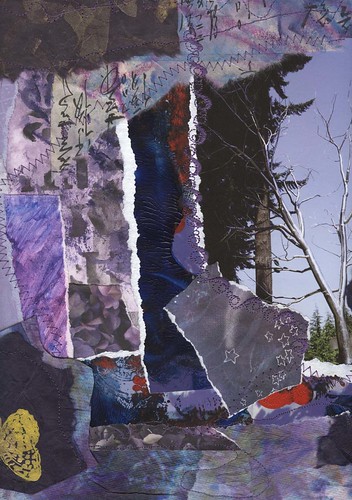
This is a work in progress of a WATER mandala for Stretch Yourself Challenge #15 for July 2008. The challenge is to create works of art the represent the five elements; earth, wind/air, fire, water and Aether/the void. Since the five elements are a spiritual guide, I felt that representing them in mandala style was fitting.
So far this piece is comprised of recycled party and prom dresses, a silk kimono, carpet samples and a plain white sheet. All of the dress fabric is some kind of recycled scrap that I received from my late Aunt Minnie. I still have some sequined dress that I am trying to work in and I need way more blue. Going with swirls and curls to get a wave/water type feeling. I am also trying to really incorporate texture with the unusual combination and layering of the fabrics. I believe this might become a tote bag to take to the pool for my swim sessions.
I will share more when it is finished. And the other elements as they are created this month. Still working on techniques from my Fiber arts book too.
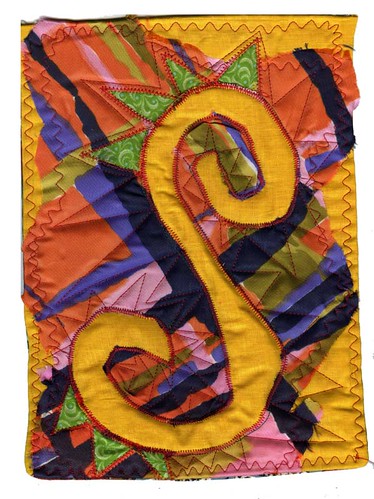
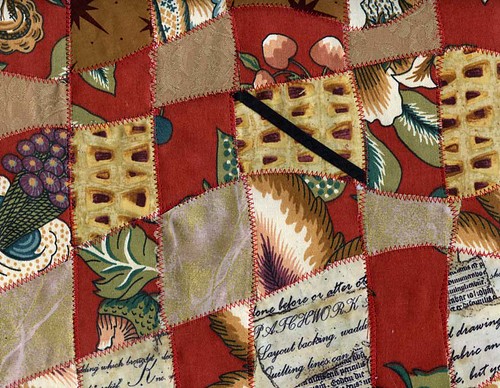
I have done a lot of ‘reverse applique’ in the past 4 years, so this is not a new technique. The book shows a different way to do it than I have been doing in my work. I really should have tried their suggested method. I layer a bunch of fabrics, sew my design and then cut away the top layers that I don’t want and allow the lower layers to show. In this piece the top most fabric is the bright print, with yellows below it and then green below that. The green is actually under the batting. I like the additional depth that this allows. The book shows cutting the holes in the top fabric first, then sewing on the behind fabrics.
I actually really like this one… again all scraps and talk about bright! So many of these fabrics are from a bag of stuff I got from my mom, that she got from storage that was originally from my GREAT Aunt Minnie. So they are from the 40’s-70’s I imagine.
So far, I am having a great time with this challenge and the resulting fabric journal is going to be very cool!
Â
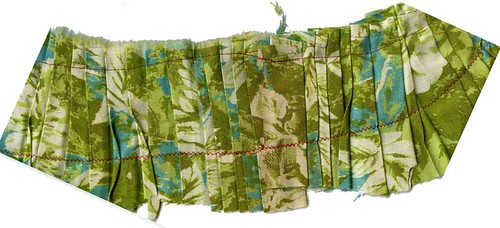
The arsty framed examples of pleating in the book used some decorative stitching to have the pleats fan in different directions. So I gave that a little try. Again I used scrap fabric (some old vintage stuff that I am QUITE sure was from a dress my grandmother wore.) I am thinking I would like to use this technique for grass areas in an upcoming piece or even a picket fence. It does have a nice texture and dimension to add to a piece. Â
While it is nothing to scream about artisitically… it is just one small puzzle piece that will be put to use with many other new techniques. So far they have all been fairly quick and easy little techniques. But new things for me to give a try, which I think is the whole purpose of the challenge…
These colors and prints are pretty garish, and the piece almost hurts my eyes to look at. BUT, in my defense these are SCRAPS that I am using to test out the idea… not necessarily a planned finished product. I think that this method is what was actually what I was supposed to be doing when I came up with this:
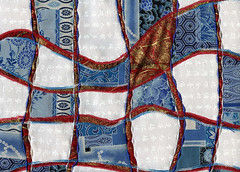
I saw this quilt and wanted to duplicate it, but I misunderstood her directions (or rather I didn’t see them until I had made up my own idea of how she did it.) I am still very pleased with how this blue and white “Peace Prayers” came out. On this one I cut 2 pieces of fabric the same size and put iron-on interfacing backing on them. Then I layed them on top of each other and used my rotary cutter to cut them into even curvy strips. I think this is where I took a different turn (ha!) I layed them all even again and now cut horizontal where I had cut vertial curvey lines. Now I had a bunch of little puzzle pieces essentially. I ironed them down to a 3rd piece of fabric, as the backing. This method gives me a whole second set of puzzle pieces to create a mirrored version of the same thing. Because of my desired meaning for the piece I wanted the red to show through. After the pieces were ironed down then I applique stitched down all the edges. As for the meaning…. this is about war… the red represents the rivers of blood shed, the blue symbolizes hope for ending the war and finally the white is for peace. I created this for a fabric journal swap back in April 2007.
So here I am finally trying the “correct” way to fabric weave. Another project from my challenge book “Exploring Textile Arts” It is actually both easy and hard. An easy concept, hard to get everything to line up just right, hard to decide on what fabrics might work best, easy to sew once all put together.
I had planned to keep all my experiments in an 8×10 format, but this didn’t really work out that small. Perhaps it will become the cover for the book. or a crazy placemat, it is just the right size for that… I’d just have to make some matching ones! RED is supposed to induce appetite. Wait… I’m trying to lose weight so scrap that idea!

This is the first of many experiments from “Exploring Textile Arts” that I am working on for the month of June 2008 for Jen’s Challenge. It uses Decorative Bobbin Sewing. (pg 88) The point behind this style of sewing is to use thicker fancy and metallic threads that ordinarily wouldn’t go through the eye of a needle. You put the fancy thread on the bobbin and sew from the bottom. I don’t actually have any of these fancy threads and I am really in a USE WHAT YOU HAVE frame of mind, since I HAVE so much. But I do want to have quilted text in my new series of work so I need to practice and experiment with the best ways of sewing in words.
The text that is sewn several times is “Digging in the dark earth” and will be part of my just starting Journey Series, this one about gardening. I printed several cursive style fonts in different sizes on paper in REVERSE, then layered that paper on the top, a felt center, with the printed fabric on bottom. IÂ then free-motion stitched this fabric sandwich using the bobbin method.

The GREEN thread words are the ones in this fashion. WOW! it is very, very hard to sew backwards cursive! I still need a LOT of practice in free motion anyway, but trying to write script is pretty hard.

The BLUE thread is when I gave up on the bobbin backwards style and flipped my fabric to the top. For one of these trials I wrote free-hand with a pen and then sewed over it. You can see the shadow of the ink, so if I end up with this method I will need to BUY some washout fabric pens or pencils… which I really need anyways to do some of the other quilting things I have planned.Â

My final trial on this piece, I just sewed the words completely free-hand.(they go crooked at the end.) This has some possibilities, but I am most leaning towards the write with a washable pen and sew over that.
I ALSO have letters that my sewing machine can do for me, so that was my next trial. (But it doesn’t really fit with the experiments in the book, just something I need to try for this series.) Finally, I wrapped up with a few practice free-motion flowers.

So that is today’s experiment. I believe I will keep with about an 8×10 size for these experiments and put them together in a fabric journal with a printed copy of my blog notes on the process.
One more practice with more words. This time using the pen method I think I like best. Now to get some washable pens. But I still feel like it is WAY Messier than I want for the piece. Ultimately it will be blue thread on blue fabric and the sky behind a figure. The idea is for it to be background that you would need to work at to read, but that does NOT detract from the other parts of the piece. (Can you read it?)

Like Lab 555 from last year, Jen is again challenging her brave friends to pick one of those dusty art books and do EVERY PROJECT! in it this month. June is the month I start my vacation (June 20th to be exact) but all the kids… and teachers.. already have summer fever. So I usually start reamping up my summer art projects about this time anyways.
I want to work towards a cohesive body of work within my medium of choice, fabric. I have really only been dabbling in it for the past 4 years. a little of this and a project here. But if I am going to show again (and yes, I believe I have figured out that I do want to do so) then I need a body of work. I still have old windows and had plans/dreams of doing more in that medium, but I have just moved on. I need to face that fact and dig in.
So this book I picked is perfect for that goal. Now I don’t even plan to do the whole book, it is a TEXTBOOK full of techniques and methods. It has 2 main sections textures and color. I am most drawn to the texture catagory (texture is my favorite part about working in fabric) and there are a ton of techniques that are totally new to me. So my goal will be to work with these different techniques of texture INTO a new series of pieces.
I have a few prelim sketches that run along the self-portrait “journey” feeling. but then I am also drawn to doing my same style of nudes that I did in my window series paper collages. So I am not sure how this series will take shape. But it WILL have new texture techniques from this book!
Because if I don’t say it, I won’t do it… so here is my ~PLAN~
Texture Activities (from part one of the afore mentioned book) that I will TRY and SHARE (not necessarily in this order)
1~ Random-cut fabric weaving
2~ Pleated Effects
3~ Machine Open Work
4~ Trapunto
5~ Double needle stitching
Then in JULY I will move into the COLOR chapter