Tag Archives: experiments

WIP Beaded Journal Project

jan 2010 WIP Beaded Journal Project

The Beaded Journal Project has begun again. The third round of this amazing project begins with January 2010 and will end in December. The goal is to make a beaded work of art that is a visual journal representing that month. You can read more about the project at the website. This year there are hundreds of people participating. I am part of blog #3 along with 100 others.

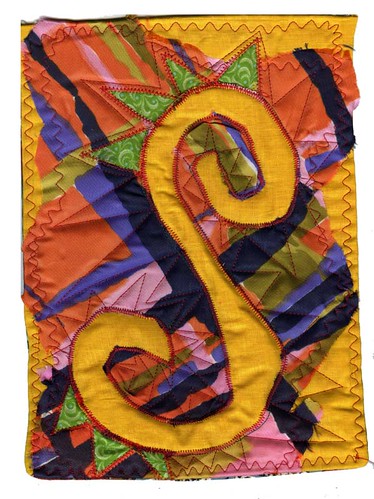
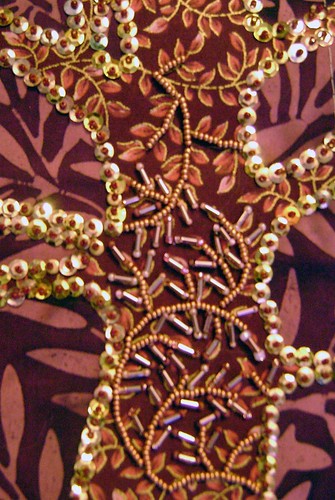
So this is my January page in progress. Last year, I did alter style pages that were big (8″x 10″) and an odd size, which is making it difficult to finish them off in a professional looking manner. But it will be done, eventually! Meanwhile I move on. This year I thought about a doll shape either flat or 3-D. But I decided that would be pushing it again. Last year was really my first exposure to beading and it was a wonderful challenge. I decided on a small (4″x6″) size and a basic postcard shape. I learned quite a few things from Robin in her class, so these are not multiple layers with batting (like last year’s, which added to the complication of finishing.) Instead just a simple piece of paper backs the fabric.

I chose “Journey” for my guiding word for 2010, so these pages will hopefully be in tune with that word as well. But I have also been very interested in the tree as a symbol lately. I like the idea of growth, the protection of bark, the stability of roots, and even the element of annual life, death, hibernation and rebirth. This month’s page represents that symbol.

I still have quite a bit that I want to do on this page, but it is moving along smoothly.


Experiment #4-B Reverse Applique’

Experiment #4-B Reverse Applique

I have done a lot of ‘reverse applique’ in the past 4 years, so this is not a new technique. The book shows a different way to do it than I have been doing in my work. I really should have tried their suggested method. I layer a bunch of fabrics, sew my design and then cut away the top layers that I don’t want and allow the lower layers to show. In this piece the top most fabric is the bright print, with yellows below it and then green below that. The green is actually under the batting. I like the additional depth that this allows. The book shows cutting the holes in the top fabric first, then sewing on the behind fabrics.

I actually really like this one… again all scraps and talk about bright! So many of these fabrics are from a bag of stuff I got from my mom, that she got from storage that was originally from my GREAT Aunt Minnie. So they are from the 40’s-70’s I imagine.

So far, I am having a great time with this challenge and the resulting fabric journal is going to be very cool!

Experiment #4-A Raw Edge Applique’

Experiment #4 Raw Edge Applique

There are several Applique techniques in my challenge book “Exploring Textile Arts“ This is called Raw-Edge because the parts that are appliqued are not finished on the edges in any way. To do this, I used iron on facing to hold down the purple and green applique shapes, then caught the edges on the main piece with a decorative stitch. I did this before adding the batting and doing the quilting. So the additional quilting areas allow the swirl and points to puff up above the rest of the piece.

This happens to be an image I tend to doodle all the time (mostly when sitting through boring meetings) so I picked it for this series of experiments. I plan to do the other 5 types with this same design.. maybe even the same color combos if I can find the right scraps. This fits my 8×10″ book plans. This is very similar to the type of applique I usually do in my collages, but I usually finish the edges with a satin stitch.

Experiment #2 Fabric Weaving


Experiment #2 fabric weaving

These colors and prints are pretty garish, and the piece almost hurts my eyes to look at. BUT, in my defense these are SCRAPS that I am using to test out the idea… not necessarily a planned finished product. I think that this method is what was actually what I was supposed to be doing when I came up with this:

WIP_FAJpeaceprayers01

I saw this quilt and wanted to duplicate it, but I misunderstood her directions (or rather I didn’t see them until I had made up my own idea of how she did it.) I am still very pleased with how this blue and white “Peace Prayers” came out. On this one I cut 2 pieces of fabric the same size and put iron-on interfacing backing on them. Then I layed them on top of each other and used my rotary cutter to cut them into even curvy strips. I think this is where I took a different turn (ha!) I layed them all even again and now cut horizontal where I had cut vertial curvey lines. Now I had a bunch of little puzzle pieces essentially. I ironed them down to a 3rd piece of fabric, as the backing. This method gives me a whole second set of puzzle pieces to create a mirrored version of the same thing. Because of my desired meaning for the piece I wanted the red to show through. After the pieces were ironed down then I applique stitched down all the edges. As for the meaning…. this is about war… the red represents the rivers of blood shed, the blue symbolizes hope for ending the war and finally the white is for peace. I created this for a fabric journal swap back in April 2007.

So here I am finally trying the “correct” way to fabric weave. Another project from my challenge bookExploring Textile Arts” It is actually both easy and hard. An easy concept, hard to get everything to line up just right, hard to decide on what fabrics might work best, easy to sew once all put together.

I had planned to keep all my experiments in an 8×10 format, but this didn’t really work out that small. Perhaps it will become the cover for the book. or a crazy placemat, it is just the right size for that… I’d just have to make some matching ones! RED is supposed to induce appetite. Wait… I’m trying to lose weight so scrap that idea!

Experiment #1 Bobbin Sewing

Experiment #1 Bobbin Sewing

This is the first of many experiments from “Exploring Textile Arts” that I am working on for the month of June 2008 for Jen’s Challenge. It uses Decorative Bobbin Sewing. (pg 88) The point behind this style of sewing is to use thicker fancy and metallic threads that ordinarily wouldn’t go through the eye of a needle. You put the fancy thread on the bobbin and sew from the bottom. I don’t actually have any of these fancy threads and I am really in a USE WHAT YOU HAVE frame of mind, since I HAVE so much. But I do want to have quilted text in my new series of work so I need to practice and experiment with the best ways of sewing in words.

The text that is sewn several times is “Digging in the dark earth” and will be part of my just starting Journey Series, this one about gardening. I printed several cursive style fonts in different sizes on paper in REVERSE, then layered that paper on the top, a felt center, with the printed fabric on bottom. I then free-motion stitched this fabric sandwich using the bobbin method.

The GREEN thread words are the ones in this fashion. WOW! it is very, very hard to sew backwards cursive! I still need a LOT of practice in free motion anyway, but trying to write script is pretty hard.

The BLUE thread is when I gave up on the bobbin backwards style and flipped my fabric to the top. For one of these trials I wrote free-hand with a pen and then sewed over it. You can see the shadow of the ink, so if I end up with this method I will need to BUY some washout fabric pens or pencils… which I really need anyways to do some of the other quilting things I have planned. 

My final trial on this piece, I just sewed the words completely free-hand.(they go crooked at the end.) This has some possibilities, but I am most leaning towards the write with a washable pen and sew over that.

I ALSO have letters that my sewing machine can do for me, so that was my next trial. (But it doesn’t really fit with the experiments in the book, just something I need to try for this series.) Finally, I wrapped up with a few practice free-motion flowers.

So that is today’s experiment. I believe I will keep with about an 8×10 size for these experiments and put them together in a fabric journal with a printed copy of my blog notes on the process.

One more practice with more words. This time using the pen method I think I like best. Now to get some washable pens. But I still feel like it is WAY Messier than I want for the piece. Ultimately it will be blue thread on blue fabric and the sky behind a figure. The idea is for it to be background that you would need to work at to read, but that does NOT detract from the other parts of the piece. (Can you read it?)