Tag Archives: purple

Reinspired!

Class Sampler

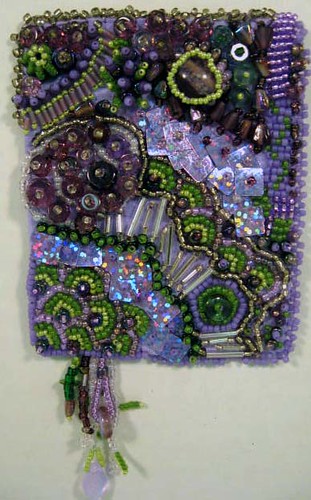
I was afraid that an 8 hours beading class would be WAY to long. and on some level it was. By the end I was making lots of mistakes. But on the other hand the time flew by quickly and we learned a TON. The techniques for beading with Robin had the goal of making a little sampler. we were given a 3″x3″ piece of fabric, basted to (acid-free) paper! this was new to me but a technique she stands by and it did work well. Gave the fabric a little stiffness while working, but not too stiff. Plus as you punch it with a needle over and over, it becomes supple.

There were only 7 people in the class. The lady next to me came from Spokane and is a crazy quilter. Her work is wonderful and she is not a newbie to beading. We did have a couple VERY new beaders but the rest of us were experienced enough. Robin is a strict but patient teacher. “both eyes on me” meant you better be watching and not trying to sneak in a few stitches. 🙂 But her directions are so clear and her drawings make something difficult to understand very easy to create. I love her drawings! There wasn’t much talking among the students. We were very focused. Beading take a lot of concentration. It is not a chatty type craft. You could hear our pins drop.

The conference provided each work station with an Ott light, which I now realize is a necessary item! The room was well lit, but freezing. Which can make it harder to bead!

We started with the basic stitches. seed stitch, then lazy stitch and it’s many vaiations, then a couching stitch and finally back stitch. I have done all of these. out of common sense and just figuring things out on my own. but the variations were mostly all new to me. All of them I have seen in RObin’s work and after we learned each one we were challenged to start identifying them in her work. For each stitch she brought around her work to show examples and variations. It was lovely to see all her work in person! Pictures online are interesting, becasue they can be in such high definition that you see them in more detail than you can in real life. but you can’t really see the texture unless you see them live.

We also learned edge stiches and dangling stitches. ALL of the work that we did is in her book that I already had. BUT it was opportunity to ASK questions while working through the stitches. and clear up some of the things that weren’t working for me as well as try ones I hadn’t been brave enough to explore yet. Learning the edge stitch and seeing her work in person to really examine HOW they were finished was the best part. It is where I have really been stuck with my own work so far. and now I have the solutions! I am excited to finish up my bead journal pieces from this year and move on to some new ones! So I have officially joined up again for Janurary. (Robin did sell us all on joining!)

She also talked about her process which helped me too. At first I used the printed fabric and beaded ON the pattern, following it like a paint by number. I love those pieces but I did move on to more solid colors and became more improvasational. As I gain more confidence I continue to get less literal. She talked about what she does when she gets stuck and how she starts out pieces. All this was very helpful.

It was a long but wonderful class and I am so glad I took it.
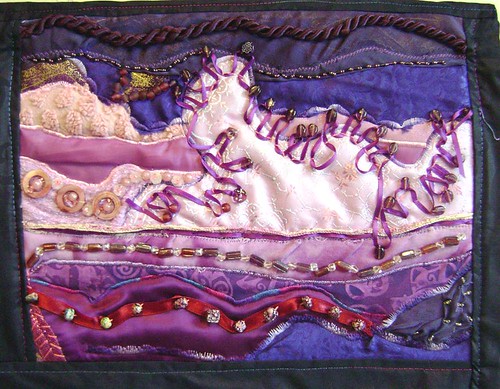
I  had quit on several months of my Beaded Journal Project pieces, leaving them semi-finished. I had not been able to figure out ways to make the backs look good, I had run out of steam and ideas on the beading on some of them and just called them finished. and I still have one month that has been sewn but not beaded yet.

BUT after this class I have been totally re inspired. I learned so many new techniques. and all the variations of them. I have been beading almost non-stop since I got back. After finishing the sampler, I revisited some of my journal pages that I had previously thought was done. I have been working on some wonderful additions to my December page. I feel like I see the fabric in a whole new way. Getting unstuck is just a bugel bead pathway away.

Also seeing her work in person turned on the light bulb for how to finish my own and ways to display them to really show them off. Now I just need to get some book board and foam core to get them done. I was also excited to share my work with Robin (which she seemed to enjoy!)

I got another one of her books (I own 3 now) and I highly recommend them!

So I signed up for another year of the beaded journal project. I plan to take on a smaller size this time! but thinking about going 3-D and making them dolls.

My House through the years

The Newest Color of Paint

The NEW purples

and a side view. I LOVE driving up the block to see this 🙂

2009Junehouse003

A horrible in-between with purple and green still needing to be painted over, this was during the painting contract from Hell.

Purple House 2007

The Purple and Blue when it was finally horribly done. (The paint contractor basically did a bad job then walked out before it was done and disappeared!)

Purple and Blue 2007

Original Colors when I bought it, with the old chain link fence too.

Original House Colors

and a side view

Original House Colors

Purple Sunset Finished

At first, I thought I had NO purple beads. I was very upset and immediately went online to order some. Then I found enough to add to my landscape quilt for the Art Quilt Explorations with Jane LaFazio. Her landscapes are very cool. I do like the ones with trees and might do a second one that way to see how it comes out. Now she does not bead her work, but I have been so into the beading lately that I just couldn’t see this landscape without some.

purple sunset finished 0215

It is finished. The completed quilt is 9X12″ and has a hanging sleeve on the top binding to hang with a wooden dowel. Lots of beads, trim and a variety of fabrics. The purples are terribly hard to photograph. I finally got this one with some natural daylight, but it still does not show the richness of the colors and the variety of textures. I am totally in love with how this came out. Purple really is a royal color. I probably need to come up with a more regal name for it.

Next I am doing my February Beaded Journal Page in this same fashion. But I am going to wait for my new beads to arrive and I still need to finish up my January page!

(Can you tell I am on vacation?)

Purple Sunset


purple sunset WIP 0214, originally uploaded by Charger’s Mommy.

Happy Valentine’s Day…

Not a big holiday for me, but I am on Mid-winter break as well so celebrating with some art time, finally!

This is the first lesson from a joggles class I am taking.
Art Quilt Explorations with Jane LaFazio

My friend Diane was posting her work from the class and I was so impressed I decided to take the class too. This will be my first time taking an online class from Joggles, so I plan to post a lot of comments and progress throughout. I am currently waiting for my forum account to be approved so I can post there.

I decided instead of a traditional grass and dirt colored landscape, that I wanted to do a sunset style color theme. Mostly because I wanted to use purple!  So after grabbing a bunch of fabrics from my stash, I went on flickr to look for some purple sunset pictures for inspiration.

Here are a few that I found:

Then I went back to my ironed pile to place them in a fashion that looked good to me. Next I did some satin stitching and fancy styles to hold the layers together. Now I am going to go add trim and beads and embroidery floss.

I have several other projects on board for this 5 day ‘weekend’ mostly for EBSQ shows. So expect to see a lot from me in the coming days.

I still need to get a February page started for the beaded journal project. I am thinking of making a duplicate of this but in my alter shape… we shall see!

Color Tag “directions”

1) obsessively collect paper and fabric for over 20 years
2) obsess about the color purple so much that you paint the inside and the outside of the house purple


3) let your studio become a complete disaster

4) finally sort everything and set aside all purple papers and images as you sort

5) sew together all these scraps on your mother’s old singer sewing machine in crazy quilt style.

6) add ribbon and other fabric elements where they fit

7) run out of papers you like and decide to make more

8) create more purple papers

8a) get white and off-white papers with images and writing and texture

8b) scribble over with purple and magenta water soluable oil pastels

8c) blend with water and silver paint

8d) hang on your cool corkboard room border to dry

9) create other “elements”

9a) get old browned paper letter stencils

9b) scribble over with purple and magenta water soluable oil pastels

9c) blend with water and silver paint

10) keep backing papers of both experiments of 8 & 9 and added stamped/stencil letters in dark purple rubber stamp ink

11) sew new papers together
12) when satisfied with a “quilt” cut out card stock tags of proper size and sew to quilt. then cut out each tag.

13) attempt to be satisfied and not continue messing with it or you will ruin it!

(created for http://groups.yahoo.com/group/ArtErratica/ swap May 2006)