Tag Archives: quilting

2008-2009 Beaded Journal Project Update

All 12 pages from last year’s Beaded Journal Project are started, 9 of them are completely done with the beading. However, I am still struggling with how to display them or back them/finish them. At first I was planning to make them a big book together, then as little shrines with equally beaded doors that closed. I tried a number of different ways to make the pages sturdy enough to stand on their own, but flexible enough to open and close. I tried thick interfacing, felt and quilt batting of different thicknesses, these were great for opening and closing the doors, but didn’t work at all for standing. Then I tried some card stock, cardboard and finally mat board. These were either too thin or too thick.  I thought I had it all figured out after Robin’s class, but I can’t seem to make it work with the odd shape. Besides, where am I ever doing to display them where I have 12 podiums that are high enough to be able to examine the details.

9 months of BJP

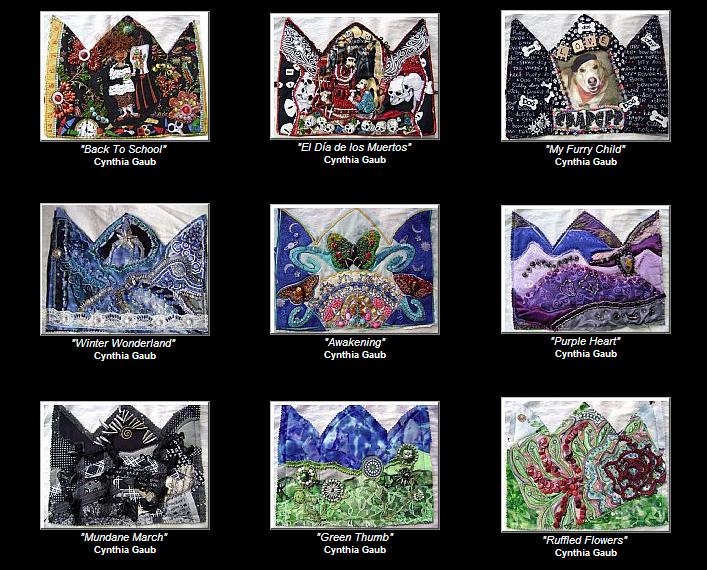
My next plan is to try and turn them into a wall hanging, still keeping them in the groups of three that were part of the original plan. But because I have already turned the edges and backed some of them I am not sure how I will attach them. I am thinking perhaps reverse applique. I auditioned some groupings and some backing fabrics. It seems that a simple black will be the best choice, other colors will detract from the work.

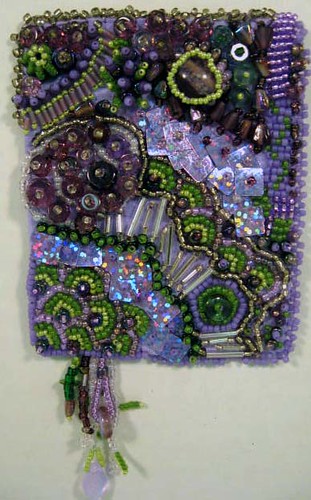
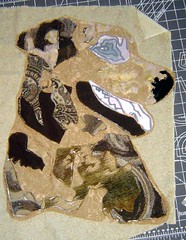
This is June’s page, quite a difference from the beginning. June is the end of the school year so it is very hectic, closing up the classroom and getting ready for the summer. I created this fabric from a doodle I did in my paper art journal at my April art retreat. I scanned in the doodle, then mirrored it in photo shop, then printed it out on fabric. I used a lot of new techniques I learned from some beading books that I acquired, and then adapted to my own style.

dec2009 062

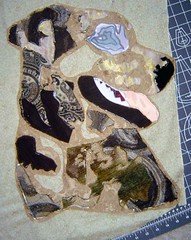
Here are the remaining ones that need to be beaded.

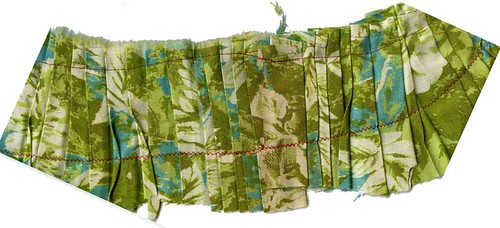
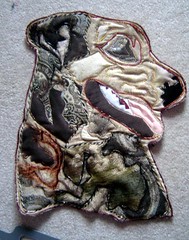
This one is July. Spending time in my garden is the main thing that I enjoy during the summer months. This one is still very raw and has no bead work yet. But it is still part of the plan.

dec2009 052

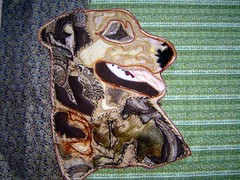
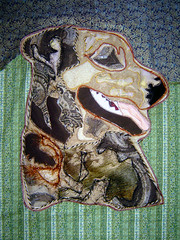
This one is August. I have been training for a triathlon all summer and August is the heaviest training month. Still need to get beading on this.

dec2009 054

I am really pleased with how the beading parts are progressing (although slowly) and I am getting really excited for the next round.

Here are some things I learned from the first round, the reading and research on beading that I have done in the process and my class with Robin.

  • 8″x10″ is WAY too big for a first beading project!!! Prior to this project I have mostly been making fabric collages from 22″x 18″ or larger. I have also made little ATC sized mini fabric collages. But these have all only had a little bit of bead embellishment. So I thought that this ‘small’ size was going to be fine. BUT for bead embellishment it was too big. ~so for my next BJP I will be creating in a smaller size~
  • Alter-shaped is way too advanced and difficult of a shape. Again for my first project. The pointy shape is hard to turn and finish. yikes!  ~so for my next BJP I will try to pick an easier shape, however I am really leaning towards dolls~
  • Quilting and including batting layers are not necessary. In the class with Robin we just used paper as a backing . This made it easier to turn the edges when the beading was done. The thick layers made this part very difficult in this first series.
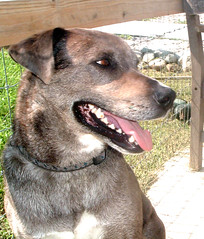
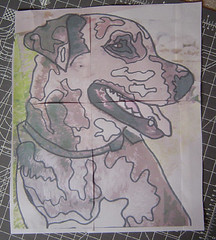
  • Printed fabrics with pictorial images will limit the beading. Because I was new to the whole thing I used some printed images to guide my beading, almost like a coloring book I beaded the images. This was fun and was a good way to start, but it is also very freeing to move to non-representational fabrics.
  • An Ott light is a GREAT advantage.
  • A bugle bead pathway is a great way to move forward when you are stuck.

So a few days from now is the NEW year and a new round of the Beaded Journal Project. Will I pick a smaller size, an easier shape, neutral farbics? I am really leaning towards dolls!

Reinspired!

Class Sampler

I was afraid that an 8 hours beading class would be WAY to long. and on some level it was. By the end I was making lots of mistakes. But on the other hand the time flew by quickly and we learned a TON. The techniques for beading with Robin had the goal of making a little sampler. we were given a 3″x3″ piece of fabric, basted to (acid-free) paper! this was new to me but a technique she stands by and it did work well. Gave the fabric a little stiffness while working, but not too stiff. Plus as you punch it with a needle over and over, it becomes supple.

There were only 7 people in the class. The lady next to me came from Spokane and is a crazy quilter. Her work is wonderful and she is not a newbie to beading. We did have a couple VERY new beaders but the rest of us were experienced enough. Robin is a strict but patient teacher. “both eyes on me” meant you better be watching and not trying to sneak in a few stitches. 🙂 But her directions are so clear and her drawings make something difficult to understand very easy to create. I love her drawings! There wasn’t much talking among the students. We were very focused. Beading take a lot of concentration. It is not a chatty type craft. You could hear our pins drop.

The conference provided each work station with an Ott light, which I now realize is a necessary item! The room was well lit, but freezing. Which can make it harder to bead!

We started with the basic stitches. seed stitch, then lazy stitch and it’s many vaiations, then a couching stitch and finally back stitch. I have done all of these. out of common sense and just figuring things out on my own. but the variations were mostly all new to me. All of them I have seen in RObin’s work and after we learned each one we were challenged to start identifying them in her work. For each stitch she brought around her work to show examples and variations. It was lovely to see all her work in person! Pictures online are interesting, becasue they can be in such high definition that you see them in more detail than you can in real life. but you can’t really see the texture unless you see them live.

We also learned edge stiches and dangling stitches. ALL of the work that we did is in her book that I already had. BUT it was opportunity to ASK questions while working through the stitches. and clear up some of the things that weren’t working for me as well as try ones I hadn’t been brave enough to explore yet. Learning the edge stitch and seeing her work in person to really examine HOW they were finished was the best part. It is where I have really been stuck with my own work so far. and now I have the solutions! I am excited to finish up my bead journal pieces from this year and move on to some new ones! So I have officially joined up again for Janurary. (Robin did sell us all on joining!)

She also talked about her process which helped me too. At first I used the printed fabric and beaded ON the pattern, following it like a paint by number. I love those pieces but I did move on to more solid colors and became more improvasational. As I gain more confidence I continue to get less literal. She talked about what she does when she gets stuck and how she starts out pieces. All this was very helpful.

It was a long but wonderful class and I am so glad I took it.

I  had quit on several months of my Beaded Journal Project pieces, leaving them semi-finished. I had not been able to figure out ways to make the backs look good, I had run out of steam and ideas on the beading on some of them and just called them finished. and I still have one month that has been sewn but not beaded yet.

BUT after this class I have been totally re inspired. I learned so many new techniques. and all the variations of them. I have been beading almost non-stop since I got back. After finishing the sampler, I revisited some of my journal pages that I had previously thought was done. I have been working on some wonderful additions to my December page. I feel like I see the fabric in a whole new way. Getting unstuck is just a bugel bead pathway away.

Also seeing her work in person turned on the light bulb for how to finish my own and ways to display them to really show them off. Now I just need to get some book board and foam core to get them done. I was also excited to share my work with Robin (which she seemed to enjoy!)

I got another one of her books (I own 3 now) and I highly recommend them!

So I signed up for another year of the beaded journal project. I plan to take on a smaller size this time! but thinking about going 3-D and making them dolls.

Ugly Quilts

What was I thinking? – The Ugly Quilt Contest

I wish I had known about this contest in time to enter! I would have totally entered my doggie car scrap quilt. As much as I love it and it is perfect for the use I intended, however it is UGLY!

doggiecarquilt001

You can see more details of the different blocks in this set. Funny, because I think some of the quilts in this contest are very nice! Too bad, I could have won some good prizes with this ugly thing!

The Start of October’s BJP page

The beginning of October’s Beaded Journal Project page. This has pieces from 5 different fabrics pieced together and using some cool decorative stitches on my machine. I like the eyelash type stitch that I did on the edge of the glow-in-the-dark eye fabric, which will also be the backing for this one. (Click to see a larger view, or make it a favorite at Flickr.) This is also my art for the day for ArtSoMoFo. I need to post my other work from this month so far as well. Now to select some beads and begin that phase.

The Pulse: Go-to blog and websites

Continuing with Seth’s previous pulse questions here is my go-to blog and go-to website

I have a ton of feeds on my google reader right now, so picking just one blog is tough. One of the things I do like to do is check out the favorite blogs of other people… often I end up on a trail of interesting blogs and get lost for hours in exploring. One that I found recently that is great for this time wasting activity is Quilting Bloggers.

Websites I always go to is easier. Flickr is at the top of my list, to see pictures from family and friends as well as participate in photo and art communities and challenges.

Summer Reading

Open Book, originally uploaded by smellyknee.

I spend a good part of any day reading books. I read books while eating, while sitting in the sun in my garden and even while watching TV. Summer is my favorite time to really get out and read. I love my local library! So lately, I have been reading a lot and thought you might like to know what!

Recently I picked up a bunch of art quilting books to get me more inspired to MAKE ART! Turns out I accidentally grabbed two from the same author. I was enjoying her quilts and thought, “wow, these two artists really have similar styles.” then I looked at the authors, duh! Same one 6 years apart. Ruth B. McDowell I have been pouring over her Art & inspirations” and “Fabric journey : an inside look at the quilts of Ruth B. McDowell I am now very interested in seeing some of her piecing pattern books. She has a very complex way of piece quilting that looks amazing!

I also re-found a book that I looked at over a year ago,”Collaborative quilting” Authors Morgan and Marston have worked together on many quilts, but I love this book for the ideas on “liberated” versions of traditional quilting blocks.

Since I am interested in teaching about fiber arts in my classes next year, I picked up a book about Faith Ringgold, “Dancing at the Louvre : Faith Ringgold’s French collection and other story quilts” Her quilting style is very unique and definitely about story telling. Something I would like to include more of in my own work.

365 day 2: Art Lives Here Doll

My final fabric books (this time around) are two on textures. My favorite part about using fabric is the physical and visual textures that you can create. But my quilts have been so flat lately I wanted some tips on adding more.  “Stitched textile collage : innovative designs for textured surfaces by Toumi and “Fantasy fabrics” by McCaffery both offer a number of ideas. I was not very impressed with Fantasy Fabrics actually. This book was all about capturing different materials behind sheer organza and tulle. Something I did on a doll in a class at ArtFiberFest. I did like the technique, but I don’t think there needs to be a book exclusively written to the idea. And although the style of images in Stitched Textile Collage were not for me, I did like the techniques and textures.

In addition to the fiber art books I am also reading some fiction. I tend to read either Young Adult fiction (so I can recommend things to my students and stay in touch with them) I am really into the Fantasy/sci-fi series about some kid travellers my MacHale. I just finished The rivers of Zadaa. I look forward to finishing the series.

Now with all these books that I am mostly reading simultaneously… I need some BOOKMARKS! In my Google Reader today I found the coolest How-to for a picture bookmark. SO I guess I am set to find the perfect photo to accompany my daily reading.


Experiment #3 Pleats


Experiment #3 Pleats

Pages 74- 77 go over the methods of pleating using a “perfect pleater” (Another project from my challenge bookExploring Textile Arts“) I looked around a bit for said “perfect pleater” and they are a bit hard to find and more money than I wanted to spend for some experimenting. So I decided to try doing pleats the old fashioned way… just folding and ironing! I think the pleater would have helped hold the ironing together in the transition from ironing board to sewing machine. The book shows ironing on some facing to the pleated piece and then removing it from the pleater in a now stabilized single piece that won’t unfold on you.

The arsty framed examples of pleating in the book used some decorative stitching to have the pleats fan in different directions. So I gave that a little try. Again I used scrap fabric (some old vintage stuff that I am QUITE sure was from a dress my grandmother wore.)  I am thinking I would like to use this technique for grass areas in an upcoming piece or even a picket fence. It does have a nice texture and dimension to add to a piece.  

While it is nothing to scream about artisitically… it is just one small puzzle piece that will be put to use with many other new techniques. So far they have all been fairly quick and easy little techniques. But new things for me to give a try, which I think is the whole purpose of the challenge…

Experiment #1 Bobbin Sewing

Experiment #1 Bobbin Sewing

This is the first of many experiments from “Exploring Textile Arts” that I am working on for the month of June 2008 for Jen’s Challenge. It uses Decorative Bobbin Sewing. (pg 88) The point behind this style of sewing is to use thicker fancy and metallic threads that ordinarily wouldn’t go through the eye of a needle. You put the fancy thread on the bobbin and sew from the bottom. I don’t actually have any of these fancy threads and I am really in a USE WHAT YOU HAVE frame of mind, since I HAVE so much. But I do want to have quilted text in my new series of work so I need to practice and experiment with the best ways of sewing in words.

The text that is sewn several times is “Digging in the dark earth” and will be part of my just starting Journey Series, this one about gardening. I printed several cursive style fonts in different sizes on paper in REVERSE, then layered that paper on the top, a felt center, with the printed fabric on bottom. I then free-motion stitched this fabric sandwich using the bobbin method.

The GREEN thread words are the ones in this fashion. WOW! it is very, very hard to sew backwards cursive! I still need a LOT of practice in free motion anyway, but trying to write script is pretty hard.

The BLUE thread is when I gave up on the bobbin backwards style and flipped my fabric to the top. For one of these trials I wrote free-hand with a pen and then sewed over it. You can see the shadow of the ink, so if I end up with this method I will need to BUY some washout fabric pens or pencils… which I really need anyways to do some of the other quilting things I have planned. 

My final trial on this piece, I just sewed the words completely free-hand.(they go crooked at the end.) This has some possibilities, but I am most leaning towards the write with a washable pen and sew over that.

I ALSO have letters that my sewing machine can do for me, so that was my next trial. (But it doesn’t really fit with the experiments in the book, just something I need to try for this series.) Finally, I wrapped up with a few practice free-motion flowers.

So that is today’s experiment. I believe I will keep with about an 8×10 size for these experiments and put them together in a fabric journal with a printed copy of my blog notes on the process.

One more practice with more words. This time using the pen method I think I like best. Now to get some washable pens. But I still feel like it is WAY Messier than I want for the piece. Ultimately it will be blue thread on blue fabric and the sky behind a figure. The idea is for it to be background that you would need to work at to read, but that does NOT detract from the other parts of the piece. (Can you read it?)

Step by step work in progress pet portrait

Step by step making a dog protrait for EBSQ Pet Swap.

Work in Progress…..
 Working with a photo to create a dog portrait

 step one making a pattern from the photo

 Next: adding bits of fabric to the background with the pattern

 a jump in time, with more fabric added

 getting close to done with the piecing part of the project, still to come quilting and embellishment

Selecting the background…
Plain Brown or tan simple background…
dibbybackground02

OR Landscape style with blue on left

dibbybackground01

OR portrait style with more blue on top
dibbybackground04

Final Product
2007WIPfabricart_april004