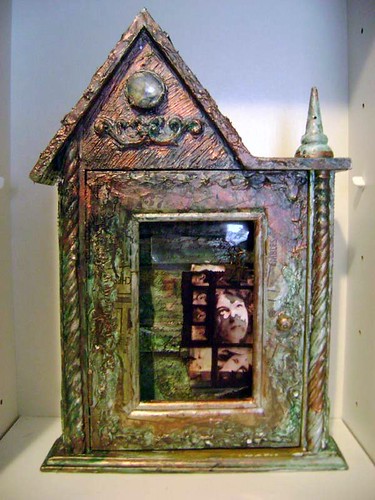
I can’t believe that I haven’t blogged about my ArtFest Projects! This is my project from Michael DeMeng’s Transparency Collage Class. The supply list included a 5’x7″ frame. I hoped that he meant the picture hole part should be 5″x7″ and thankfully I was right. This frame was actually something I found in the art asylum over two years ago. I painted it silver and planned to turn it into a shrine. Unfortunately, it sat around and gathered dust as I did not find inspiration. I was glad to be able to turn it into something unique.
Michael DeMeng’s transparency class was held in the art asylum which ROCKED! We were able to look for lots of extra cool things to add to our assemblages (said with a Michael accent) I really did learn quite a bit in this class. I learned some new words (although they are coined Michael words) like the “usuag†actually not sure how to spell it but it stands for the usual colors he likes to mix. He shared a lot about mixing paints, creating washes and layering. He shared how to put a wash over metal (heat it with a heat gun first) He also talked about how assemblage is all about problem solving and that you need a ‘visual bridge’ to bring pieces together. . I didn’t take any notes or do any journaling this year, just wasn’t into it, but I wish I had written a few things down in this class.

I do admit that after taking his class I understand what all the buz was about. Michael is so funny, attentive, personable (uses your first name in a way that isn’t creepy) and really wants you to learn. He encouraged us to use new power tools, never tried to push his ideas or do something for us. He gave great feedback and though the hour long critique was long, it was also valuable. I haven’t really been in an adult art critique since college. How many times do we as artists working in our own homes get that opportunity? I almost wish there had been a platform for more peer to peer critique and feedback. I also learned how to make paper look burned without burning by using some simple paint techniques.
My favorite new supply was regular household caulk. It was great for texture and added depth. I used it over most of the front of my shrine. I didn’t have the exact types of acrylic washes that Michael recommends, but watered down my regular acrylics to get a similar effects. With the transparency we used a little white paint on the back of small areas to help them stand out more, this is how he makes the eyes really stand out.

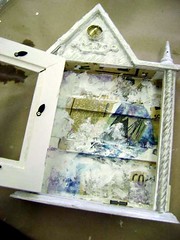
The inside is even more layered and complex than the outside. I covered most of the silver painted frame with strips of old book pages(inside and out) before doing different washes and texture layers. I included puzzle pieces, an old compass, some mini apothecary bottles and several different transparencies. I had plans for many things to dangle off other areas and drilled the necessary holes (using electric tools was a new thing for me.) Since I ran out of time in the class these items did not get added at the time, I am still debating whether to add them, or leave it as is. (see some more detail pictures in my flickr Artfest 2008 Set)
When I am working on a series… titles are a cinch! But when I have something like this that is out of the norm it is more difficult. “Eyes Wide Forward” is what comes to me right now, we will see how it sits.
Your shrine came out awesome! It’s amazing that that you used caulking for texture!