PURPLE! but moving towards some blues these days.
Continuing with Seth’s Questions from the Pulse: ONE ARTIST THAT INSPIRES ME IS…
Currently I think I would have to say that Jen Worden inspires me the most right now for several reasons.
1) She hosts challenges. over the past several years she has hosted different challenges in different places and I always give them a try. They help keep me going to my studio and making stuff!
two) She also is a triathlete, something that I am aspiring to myself.
III) She makes the coolest stuff that is way different from mine and is part of a design team. (I am not really sure what a design team is… but it sounds cool)
Seth from the Altered Page has gathered some of my favorite online artists and asked them some questions about their art and their process, figuratively taking The Pulse of the online arts community. So far he has done this twice, each time posing different questions to different artists. Today I noticed that he was preparing for another round of the game. I quickly emailed him and asked to play along. I was tickled when he invited me to play and said, “I have been to your blog many times and love the work you do — so much variety in so many media.”Â
While he prepares for the August edition of The Pulse, and I gather my thoughts on the current round of questions, he is sharing a walk though memory lane by reviewing past answers. I thought it would be fun to consider some of these questions for myself as well. I have been searching for a little bit of direction and inspiration these days, so why not? (click on the question if you want to see what other artists, like my friends Bridgette Guerzon Mills,  Jen Worden and Teesha Moore had to say on the subjects.)
IF I COULD TAKE A CLASS FROM ONE ARTIST FROM ANYTIME IN HISTORY, INCLUDING TODAY, IT WOULD BE… One of the great things about being a teacher is that I have to do professional development all the time. I am literally required to take classes. Although most of these have to be educationally related, I purposefully include art classes as well. So over the years I have taken many fun classes from people like Michael DeMeng, and attended lectures by the likes of Nick Bantock. I think that if I could reach back in time Dali would be a top choice. He is so insane! and he also did artwork in a variety of mediums including film and photography (two of my favorites!) I would also like to learn really wonderful swirls and patterns from Klimt. Of living artists I really want to experience working with Anahata Katkin and Traci Bautista.
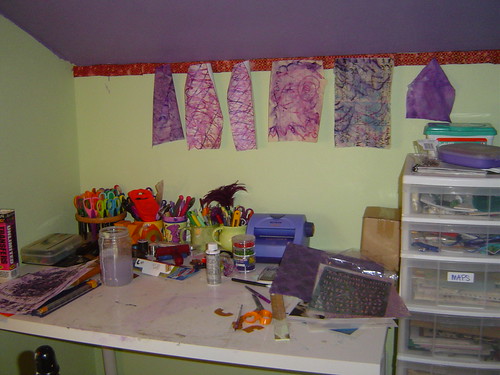
5 THINGS ON MY STUDIO TABLE RIGHT NOW INCLUDE… Besides being a BIG mess that needs cleaning once again, my collage table hasn’t seen much use lately, which is why it needs cleaning. It currently has, among other things, some new scissors, three mugs full of special edge scissors, an old map to cover the surface and protect it from paint stains…which then will be used as a background of something eventually, some special golden acrylic texture bases that I should use or give to my friend Amy who would actually use them and my Artfest 2008 button.
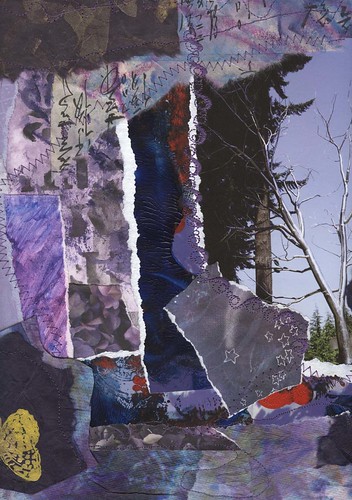
My final day of ArtFest 2008 was Judy Wise’s floor cloth class. It was not a first choice (I wanted the waxy layers one).  I was pretty envious of what I saw coming out of some of the classes that had been my top choices. Plus the room was tiny and therefore SO crowded that it was just uncomfortable. Here we were painting large canvases and the table space we each had was barely the size of our canvas. We had to watch out for paints and elbows, while storing most of our supplies on the floor. I held my paint palette in my hand most of the time, which was tiring, something I am not used to at all. Despite what could have been a horribly bad day… I got into the right head space, adapted for my needs in order to enjoy the time to paint. Of course I injected collage elements… it is impossible for paper to stay OUT of my work.
Judy went over some hints about prepping your canvas to be a floor cloth. She gave out a lovely color pamphlet and showed us a bunch of her canvases. Then we got right to work. I know I was tired and overstimulated at this point in the retreat, but I don’t feel that I really learned anything new in this class.  I only spent a few hours on this before it felt finished, and I was FINISHED. I cleaned up early and went back to nap. Since I haven’t painted in this size before, I was actually impressed with my final project. This piece started my ideas for my current series about journeys.
I won’t be walking on this! I do have a bunch of unstretched canvas that might someday become a floor cloth. For now this one will be named “Girl Traveller“
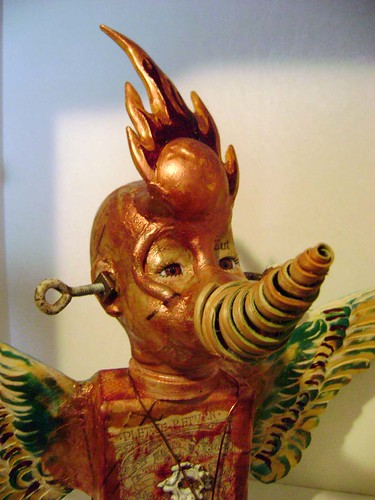
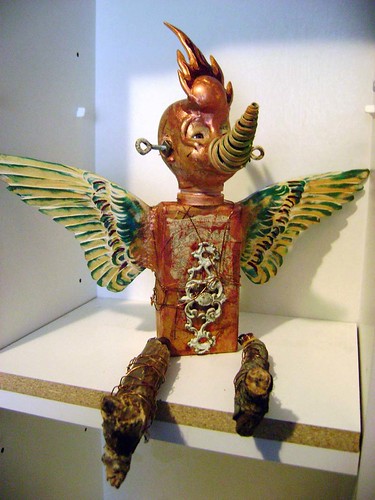
My first class at Artfest 2008 was Opie and Linda Obrien for Who’s your Dada Dolls. We all received the same head and block for a body, but it is amazing the different things that came out of that class. I find that incredibly fascinating, the different ways to solve the same problem that can come from a group of very creative people. (Here are some examples from show and tell night) I was also amazed at how little Jen brought with her… I had tons of stuff! but her work was amazing none-the-less. I kept offering her some of my junk… but apparently she likes a challenge.
Opie and Linda are a hoot and I learned some VERY cool things about apoxie sculpt. A material that I had never heard of let alone tried. On my first piece, I really only used the apoxie as an attachment substance. It worked well to connect a plastic comet to the doll head and the heavy wooden wings to the wooden block body. The material takes paint easily and blends in to the sculpture, in addition to being a super way to attach awkward pieces. I would love to explore it more, perhaps. I really want to move beyond mixed media and sculpture in general to focus more on fabric. I do love sculpture so who knows what I will do! I wish I had learned more about wire and sculpture attachments but Opie and Linda had too much desire to do things for their students.
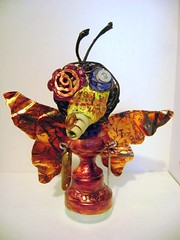 I brought some wings that have been in one of my mixed media drawers for awhile. These went on my body right away. But then I was stuck on how top heavy my piece was turning out. While I pondered this problem, I walked the room to see what other people were creating. Then IÂ worked on some more sculpting material on a second piece, also with wings. I am not much of a clay sculptor, but I was so impressed and inspired with what some other classmates were designing, I had to try something a little more textured and design oriented. This little bug was the results.
Â
Â
 Luckily on the walk back from lunch I found a couple of sticks that looked like they were legs with high heels. Turns out they were the perfect finish to balance out my first piece. I love these two dolls together, so I have named them “Little Boy Bird and Bitsy Bug“Â
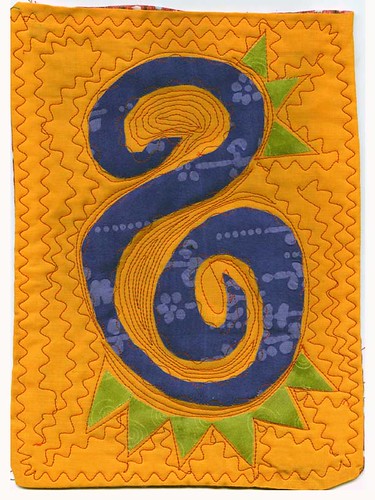
I have done a lot of ‘reverse applique’ in the past 4 years, so this is not a new technique. The book shows a different way to do it than I have been doing in my work. I really should have tried their suggested method. I layer a bunch of fabrics, sew my design and then cut away the top layers that I don’t want and allow the lower layers to show. In this piece the top most fabric is the bright print, with yellows below it and then green below that. The green is actually under the batting. I like the additional depth that this allows. The book shows cutting the holes in the top fabric first, then sewing on the behind fabrics.
I actually really like this one… again all scraps and talk about bright! So many of these fabrics are from a bag of stuff I got from my mom, that she got from storage that was originally from my GREAT Aunt Minnie. So they are from the 40’s-70’s I imagine.
So far, I am having a great time with this challenge and the resulting fabric journal is going to be very cool!
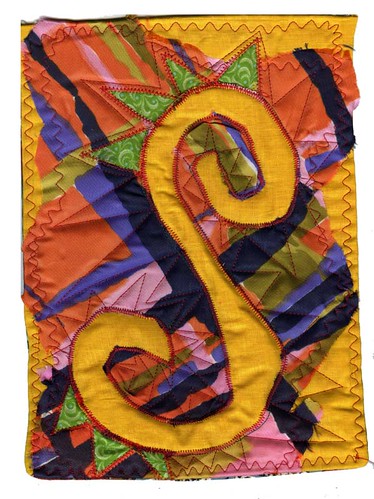
There are several Applique techniques in my challenge book “Exploring Textile Arts“ This is called Raw-Edge because the parts that are appliqued are not finished on the edges in any way. To do this, I used iron on facing to hold down the purple and green applique shapes, then caught the edges on the main piece with a decorative stitch. I did this before adding the batting and doing the quilting. So the additional quilting areas allow the swirl and points to puff up above the rest of the piece.
This happens to be an image I tend to doodle all the time (mostly when sitting through boring meetings) so I picked it for this series of experiments. I plan to do the other 5 types with this same design.. maybe even the same color combos if I can find the right scraps. This fits my 8×10″ book plans. This is very similar to the type of applique I usually do in my collages, but I usually finish the edges with a satin stitch.
These colors and prints are pretty garish, and the piece almost hurts my eyes to look at. BUT, in my defense these are SCRAPS that I am using to test out the idea… not necessarily a planned finished product. I think that this method is what was actually what I was supposed to be doing when I came up with this:
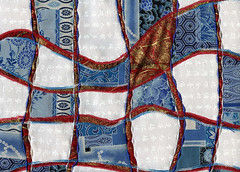
I saw this quilt and wanted to duplicate it, but I misunderstood her directions (or rather I didn’t see them until I had made up my own idea of how she did it.) I am still very pleased with how this blue and white “Peace Prayers” came out. On this one I cut 2 pieces of fabric the same size and put iron-on interfacing backing on them. Then I layed them on top of each other and used my rotary cutter to cut them into even curvy strips. I think this is where I took a different turn (ha!) I layed them all even again and now cut horizontal where I had cut vertial curvey lines. Now I had a bunch of little puzzle pieces essentially. I ironed them down to a 3rd piece of fabric, as the backing. This method gives me a whole second set of puzzle pieces to create a mirrored version of the same thing. Because of my desired meaning for the piece I wanted the red to show through. After the pieces were ironed down then I applique stitched down all the edges. As for the meaning…. this is about war… the red represents the rivers of blood shed, the blue symbolizes hope for ending the war and finally the white is for peace. I created this for a fabric journal swap back in April 2007.
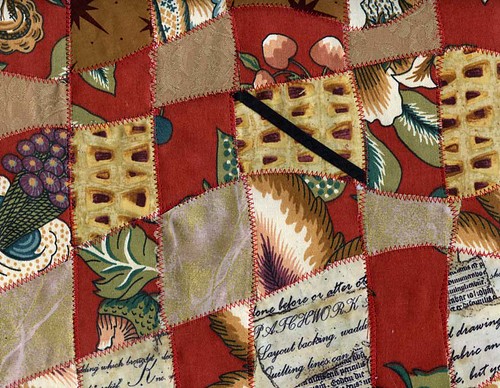
So here I am finally trying the “correct” way to fabric weave. Another project from my challenge book “Exploring Textile Arts” It is actually both easy and hard. An easy concept, hard to get everything to line up just right, hard to decide on what fabrics might work best, easy to sew once all put together.
I had planned to keep all my experiments in an 8×10 format, but this didn’t really work out that small. Perhaps it will become the cover for the book. or a crazy placemat, it is just the right size for that… I’d just have to make some matching ones! RED is supposed to induce appetite. Wait… I’m trying to lose weight so scrap that idea!
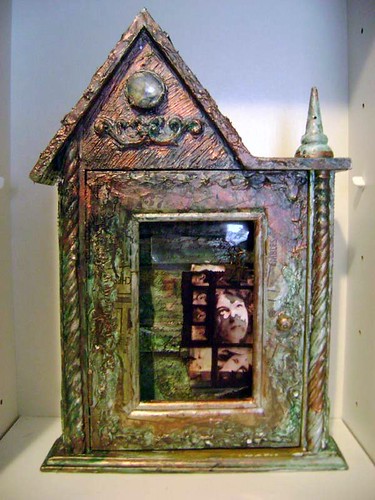
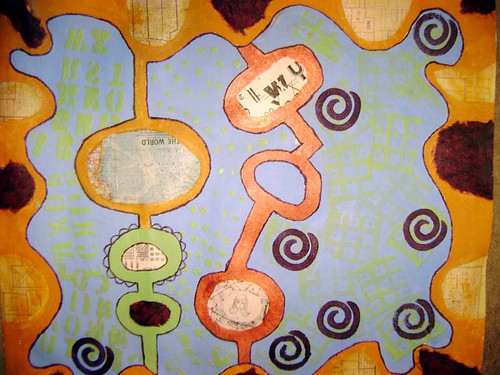
I can’t believe that I haven’t blogged about my ArtFest Projects! This is my project from Michael DeMeng’s Transparency Collage Class. The supply list included a 5’x7″ frame. I hoped that he meant the picture hole part should be 5″x7″ and thankfully I was right. This frame was actually something I found in the art asylum over two years ago. I painted it silver and planned to turn it into a shrine. Unfortunately, it sat around and gathered dust as I did not find inspiration. I was glad to be able to turn it into something unique.
Michael DeMeng’s transparency class was held in the art asylum which ROCKED! We were able to look for lots of extra cool things to add to our assemblages (said with a Michael accent) I really did learn quite a bit in this class. I learned some new words (although they are coined Michael words) like the “usuag†actually not sure how to spell it but it stands for the usual colors he likes to mix. He shared a lot about mixing paints, creating washes and layering. He shared how to put a wash over metal (heat it with a heat gun first) He also talked about how assemblage is all about problem solving and that you need a ‘visual bridge’ to bring pieces together. . I didn’t take any notes or do any journaling this year, just wasn’t into it, but I wish I had written a few things down in this class.

I do admit that after taking his class I understand what all the buz was about. Michael is so funny, attentive, personable (uses your first name in a way that isn’t creepy) and really wants you to learn. He encouraged us to use new power tools, never tried to push his ideas or do something for us. He gave great feedback and though the hour long critique was long, it was also valuable. I haven’t really been in an adult art critique since college. How many times do we as artists working in our own homes get that opportunity? I almost wish there had been a platform for more peer to peer critique and feedback. I also learned how to make paper look burned without burning by using some simple paint techniques.
My favorite new supply was regular household caulk. It was great for texture and added depth. I used it over most of the front of my shrine. I didn’t have the exact types of acrylic washes that Michael recommends, but watered down my regular acrylics to get a similar effects. With the transparency we used a little white paint on the back of small areas to help them stand out more, this is how he makes the eyes really stand out.

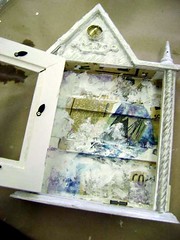
The inside is even more layered and complex than the outside. I covered most of the silver painted frame with strips of old book pages(inside and out) before doing different washes and texture layers. I included puzzle pieces, an old compass, some mini apothecary bottles and several different transparencies. I had plans for many things to dangle off other areas and drilled the necessary holes (using electric tools was a new thing for me.) Since I ran out of time in the class these items did not get added at the time, I am still debating whether to add them, or leave it as is. (see some more detail pictures in my flickr Artfest 2008 Set)
When I am working on a series… titles are a cinch! But when I have something like this that is out of the norm it is more difficult. “Eyes Wide Forward” is what comes to me right now, we will see how it sits.
Like Lab 555 from last year, Jen is again challenging her brave friends to pick one of those dusty art books and do EVERY PROJECT! in it this month. June is the month I start my vacation (June 20th to be exact) but all the kids… and teachers.. already have summer fever. So I usually start reamping up my summer art projects about this time anyways.
I want to work towards a cohesive body of work within my medium of choice, fabric. I have really only been dabbling in it for the past 4 years. a little of this and a project here. But if I am going to show again (and yes, I believe I have figured out that I do want to do so) then I need a body of work. I still have old windows and had plans/dreams of doing more in that medium, but I have just moved on. I need to face that fact and dig in.
So this book I picked is perfect for that goal. Now I don’t even plan to do the whole book, it is a TEXTBOOK full of techniques and methods. It has 2 main sections textures and color. I am most drawn to the texture catagory (texture is my favorite part about working in fabric) and there are a ton of techniques that are totally new to me. So my goal will be to work with these different techniques of texture INTO a new series of pieces.
I have a few prelim sketches that run along the self-portrait “journey” feeling. but then I am also drawn to doing my same style of nudes that I did in my window series paper collages. So I am not sure how this series will take shape. But it WILL have new texture techniques from this book!
Because if I don’t say it, I won’t do it… so here is my ~PLAN~
Texture Activities (from part one of the afore mentioned book) that I will TRY and SHARE (not necessarily in this order)
1~ Random-cut fabric weaving
2~ Pleated Effects
3~ Machine Open Work
4~ Trapunto
5~ Double needle stitching
Then in JULY I will move into the COLOR chapter