Tag Archives: collage

Playing Favorites: abstraction

Continuing with Seth’s Playing Favorites series I first pick my least favorite to contrast with my favorite.

~not~ my favorite

Abstract art is harder than you might think. I know that I thought that it was pretty easy. You know those paintings that you see and thing “my kid could do that” but then I had to make an abstract painting for an EBSQ Challenge. After creating this painting, I had a much better appreciation for people that primarily create in the abstract. Seth features some pretty good work here, so check out what the experts choose. Playing Favorites: abstraction 

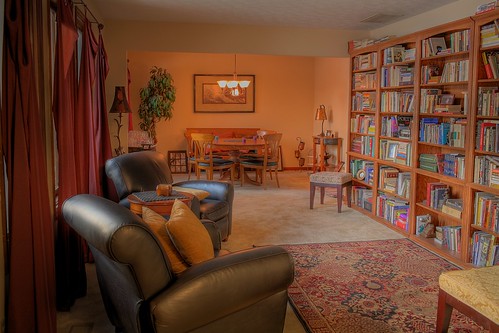
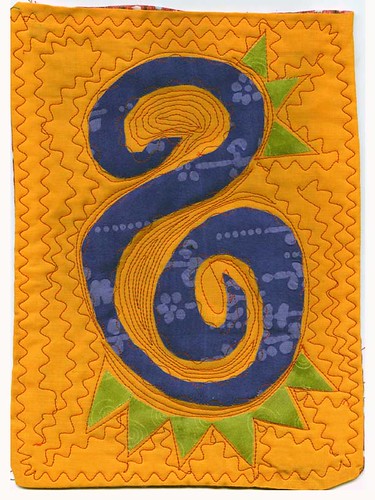
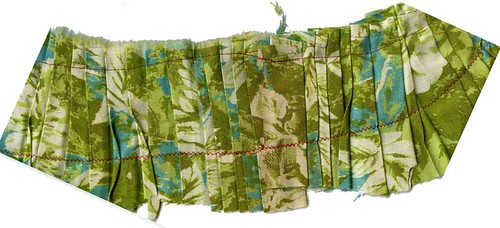
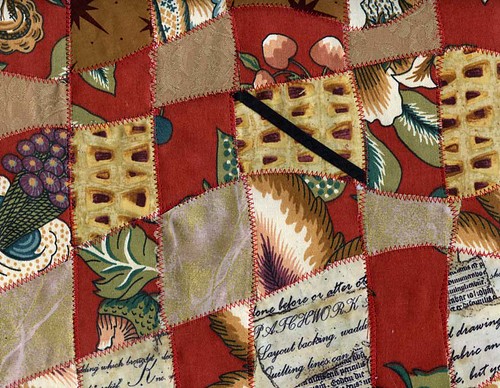
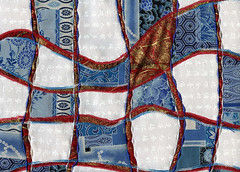
Since then I realised that when I stick to collage, I am not so bad at abstract art. Although I noticed I do tend to stick with the monochromatic theme. The piece below is a combination of papers, fabrics and ribbons sewn together in big random sheets. It was then trimmed to book page size and reassembled in blocks. It is both random and organized, which is what I think makes up a good abstract piece. Of course I can’t resist getting in some text pieces.

recycledsin.jpg

Sinful

Playing Favorites: journal entry

VJ03journal12LG.jpg

Playing Favorites: journal entry

Visual Journals… now that is something I need to do more of. It seems that since I have been blogging, and writing online, I have done less journal writing on paper. This page is probably from 2003. I like the thoughts and reflections, as much as the images that I put together along with the meaning that they both hold for me. The word interesting has a lot of both positive and negative meaning for me, so it is very weighted. But I find myself using it a lot with my students… when I am not sure I can come up with something positive and constructive to say, it slips out.

Playing Favorites: the library


The Library, originally uploaded by v_stamey. The library I WISH I had….

Next to faces, I think words or text in art is one of my favorite subject. But I think that is for another entry, this is about BOOKS! which is just as good. I love books! I love reading them, collecting them, altering them and making them. I have taken classes on book binding, participated in Altered Book round robins and tip-in swaps. I have even taught and shared the art of altered books with my students. I dream of having a house where I have a room that is JUST for books. I picture it as one of those turret round multi-story rooms with a ladder to reach higher levels of books.

So anyways… here is my pick for Seth’s Playing Favorites: the library.

lovebookCV.jpg

This is a mixed media book that I made inspired by DJ Pettitt. I bought a kit from her that included some images, transparent and white papers and fabrics along with a mini instruction booklet on how to do image transfers. I was later able to take a class from her at ArtFiber Fest in 2006.

As much as I love to make paper books, I am more interested now in making fabric books and journals. You are sure to see some of these in the near future!

Playing Favorites: face to face

Continuing Seth’s game of selecting and describing our favorite creations, we come to the face to face catagory. Showing work in a variety of mediums, the thing they all have in common is the subject of a face. Picking a favorite will be tough for me, as I have done many faces, both in fabric and paper. In fact, I did an entire series called, “Saving Face

dramaqueen

Inspiration/ Meaning: These pieces were created as part of the Saving Face series. I wanted to focus on the personality and emotional expression of the face. This piece was made as I struggled with removing personal drama from my life.
Creation: Mixed Media Paper & Glass Collage; This piece was created with layers of handmade papers, sewing patterns, and book pages applied to glass. Created in 2002.
Size: 39” H x 29” W including window frame

This one is called, “The Drama Queen” actually I think it originally had a longer title, something about the demise of the drama queen went without notice or something about basically begging for attention in all the wrong ways and for all all the wrong reasons, but more cleverly worded. My titles have often been long, poems or stories even. Sometimes I even come up with the title first and work my way towards that in my art. This one, and all of the ones in this series, started from photographs that I took of some friends and family. I purposefully had them make dramatic emotional faces.

Thinking about this really makes me want to get back to this series! hmmmm… food for thought.

Playing Favorites: Assemblege

In Seth’s second set of questions it looks like he asked artists to pick out their favorite art peices (that they have created) within a number of different categories. He says to “Imagine a museum filled with the work of all your favorite artists working in all your favorite artistic mediums. Now imagine that every piece of artwork has been hand chosen by each artist as their absolute favorites. Then imagine that printed by each piece of art is an explanation written by the artist detailing their selection.”  So with that, here is My Playing Favorites. First up: Assemblage (click to see other artist’s favorite picks, some VERY cool art is represented here.)

Artfest: Michael DeMeng Class

I haven’t done a ton of assemblege so I think my favorite is my most recent. This was created in Michael DeMeng’s class at artfest 2008 and I talk more in detail about the experience here.

The Pulse: ONE ARTIST THAT INSPIRES ME IS…

Continuing with Seth’s Questions from the Pulse: ONE ARTIST THAT INSPIRES ME IS

Currently I think I would have to say that Jen Worden inspires me the most right now for several reasons.

1) She hosts challenges. over the past several years she has hosted different challenges in different places and I always give them a try. They help keep me going to my studio and making stuff!

two) She also is a triathlete, something that I am aspiring to myself.

III) She makes the coolest stuff that is way different from mine and is part of a design team. (I am not really sure what a design team is… but it sounds cool)

Experiment #4-B Reverse Applique’

Experiment #4-B Reverse Applique

I have done a lot of ‘reverse applique’ in the past 4 years, so this is not a new technique. The book shows a different way to do it than I have been doing in my work. I really should have tried their suggested method. I layer a bunch of fabrics, sew my design and then cut away the top layers that I don’t want and allow the lower layers to show. In this piece the top most fabric is the bright print, with yellows below it and then green below that. The green is actually under the batting. I like the additional depth that this allows. The book shows cutting the holes in the top fabric first, then sewing on the behind fabrics.

I actually really like this one… again all scraps and talk about bright! So many of these fabrics are from a bag of stuff I got from my mom, that she got from storage that was originally from my GREAT Aunt Minnie. So they are from the 40’s-70’s I imagine.

So far, I am having a great time with this challenge and the resulting fabric journal is going to be very cool!

Experiment #4-A Raw Edge Applique’

Experiment #4 Raw Edge Applique

There are several Applique techniques in my challenge book “Exploring Textile Arts“ This is called Raw-Edge because the parts that are appliqued are not finished on the edges in any way. To do this, I used iron on facing to hold down the purple and green applique shapes, then caught the edges on the main piece with a decorative stitch. I did this before adding the batting and doing the quilting. So the additional quilting areas allow the swirl and points to puff up above the rest of the piece.

This happens to be an image I tend to doodle all the time (mostly when sitting through boring meetings) so I picked it for this series of experiments. I plan to do the other 5 types with this same design.. maybe even the same color combos if I can find the right scraps. This fits my 8×10″ book plans. This is very similar to the type of applique I usually do in my collages, but I usually finish the edges with a satin stitch.

Experiment #3 Pleats


Experiment #3 Pleats

Pages 74- 77 go over the methods of pleating using a “perfect pleater” (Another project from my challenge bookExploring Textile Arts“) I looked around a bit for said “perfect pleater” and they are a bit hard to find and more money than I wanted to spend for some experimenting. So I decided to try doing pleats the old fashioned way… just folding and ironing! I think the pleater would have helped hold the ironing together in the transition from ironing board to sewing machine. The book shows ironing on some facing to the pleated piece and then removing it from the pleater in a now stabilized single piece that won’t unfold on you.

The arsty framed examples of pleating in the book used some decorative stitching to have the pleats fan in different directions. So I gave that a little try. Again I used scrap fabric (some old vintage stuff that I am QUITE sure was from a dress my grandmother wore.)  I am thinking I would like to use this technique for grass areas in an upcoming piece or even a picket fence. It does have a nice texture and dimension to add to a piece.  

While it is nothing to scream about artisitically… it is just one small puzzle piece that will be put to use with many other new techniques. So far they have all been fairly quick and easy little techniques. But new things for me to give a try, which I think is the whole purpose of the challenge…

Experiment #2 Fabric Weaving


Experiment #2 fabric weaving

These colors and prints are pretty garish, and the piece almost hurts my eyes to look at. BUT, in my defense these are SCRAPS that I am using to test out the idea… not necessarily a planned finished product. I think that this method is what was actually what I was supposed to be doing when I came up with this:

WIP_FAJpeaceprayers01

I saw this quilt and wanted to duplicate it, but I misunderstood her directions (or rather I didn’t see them until I had made up my own idea of how she did it.) I am still very pleased with how this blue and white “Peace Prayers” came out. On this one I cut 2 pieces of fabric the same size and put iron-on interfacing backing on them. Then I layed them on top of each other and used my rotary cutter to cut them into even curvy strips. I think this is where I took a different turn (ha!) I layed them all even again and now cut horizontal where I had cut vertial curvey lines. Now I had a bunch of little puzzle pieces essentially. I ironed them down to a 3rd piece of fabric, as the backing. This method gives me a whole second set of puzzle pieces to create a mirrored version of the same thing. Because of my desired meaning for the piece I wanted the red to show through. After the pieces were ironed down then I applique stitched down all the edges. As for the meaning…. this is about war… the red represents the rivers of blood shed, the blue symbolizes hope for ending the war and finally the white is for peace. I created this for a fabric journal swap back in April 2007.

So here I am finally trying the “correct” way to fabric weave. Another project from my challenge bookExploring Textile Arts” It is actually both easy and hard. An easy concept, hard to get everything to line up just right, hard to decide on what fabrics might work best, easy to sew once all put together.

I had planned to keep all my experiments in an 8×10 format, but this didn’t really work out that small. Perhaps it will become the cover for the book. or a crazy placemat, it is just the right size for that… I’d just have to make some matching ones! RED is supposed to induce appetite. Wait… I’m trying to lose weight so scrap that idea!