Tag Archives: Fiber Goodness

Experiment #4-A Raw Edge Applique’

Experiment #4 Raw Edge Applique

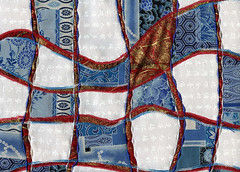
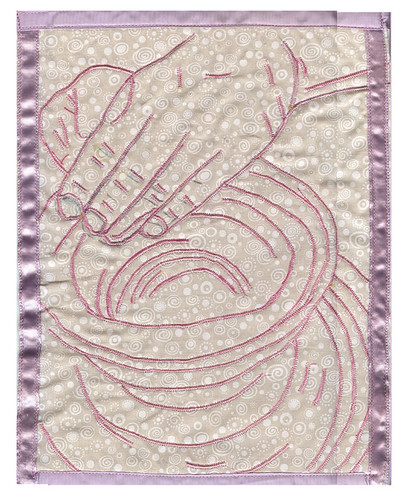
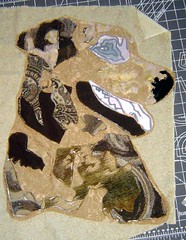
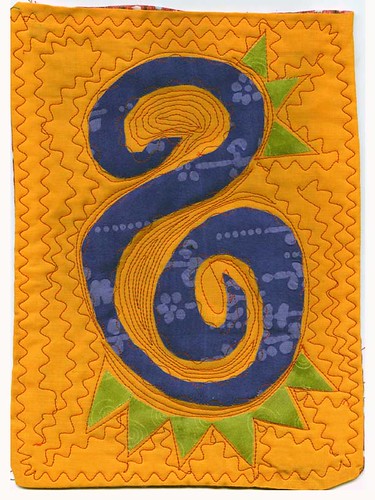
There are several Applique techniques in my challenge book “Exploring Textile Arts“ This is called Raw-Edge because the parts that are appliqued are not finished on the edges in any way. To do this, I used iron on facing to hold down the purple and green applique shapes, then caught the edges on the main piece with a decorative stitch. I did this before adding the batting and doing the quilting. So the additional quilting areas allow the swirl and points to puff up above the rest of the piece.

This happens to be an image I tend to doodle all the time (mostly when sitting through boring meetings) so I picked it for this series of experiments. I plan to do the other 5 types with this same design.. maybe even the same color combos if I can find the right scraps. This fits my 8×10″ book plans. This is very similar to the type of applique I usually do in my collages, but I usually finish the edges with a satin stitch.

Experiment #3 Pleats


Experiment #3 Pleats

Pages 74- 77 go over the methods of pleating using a “perfect pleater” (Another project from my challenge bookExploring Textile Arts“) I looked around a bit for said “perfect pleater” and they are a bit hard to find and more money than I wanted to spend for some experimenting. So I decided to try doing pleats the old fashioned way… just folding and ironing! I think the pleater would have helped hold the ironing together in the transition from ironing board to sewing machine. The book shows ironing on some facing to the pleated piece and then removing it from the pleater in a now stabilized single piece that won’t unfold on you.

The arsty framed examples of pleating in the book used some decorative stitching to have the pleats fan in different directions. So I gave that a little try. Again I used scrap fabric (some old vintage stuff that I am QUITE sure was from a dress my grandmother wore.)  I am thinking I would like to use this technique for grass areas in an upcoming piece or even a picket fence. It does have a nice texture and dimension to add to a piece.  

While it is nothing to scream about artisitically… it is just one small puzzle piece that will be put to use with many other new techniques. So far they have all been fairly quick and easy little techniques. But new things for me to give a try, which I think is the whole purpose of the challenge…

Experiment #2 Fabric Weaving


Experiment #2 fabric weaving

These colors and prints are pretty garish, and the piece almost hurts my eyes to look at. BUT, in my defense these are SCRAPS that I am using to test out the idea… not necessarily a planned finished product. I think that this method is what was actually what I was supposed to be doing when I came up with this:

WIP_FAJpeaceprayers01

I saw this quilt and wanted to duplicate it, but I misunderstood her directions (or rather I didn’t see them until I had made up my own idea of how she did it.) I am still very pleased with how this blue and white “Peace Prayers” came out. On this one I cut 2 pieces of fabric the same size and put iron-on interfacing backing on them. Then I layed them on top of each other and used my rotary cutter to cut them into even curvy strips. I think this is where I took a different turn (ha!) I layed them all even again and now cut horizontal where I had cut vertial curvey lines. Now I had a bunch of little puzzle pieces essentially. I ironed them down to a 3rd piece of fabric, as the backing. This method gives me a whole second set of puzzle pieces to create a mirrored version of the same thing. Because of my desired meaning for the piece I wanted the red to show through. After the pieces were ironed down then I applique stitched down all the edges. As for the meaning…. this is about war… the red represents the rivers of blood shed, the blue symbolizes hope for ending the war and finally the white is for peace. I created this for a fabric journal swap back in April 2007.

So here I am finally trying the “correct” way to fabric weave. Another project from my challenge bookExploring Textile Arts” It is actually both easy and hard. An easy concept, hard to get everything to line up just right, hard to decide on what fabrics might work best, easy to sew once all put together.

I had planned to keep all my experiments in an 8×10 format, but this didn’t really work out that small. Perhaps it will become the cover for the book. or a crazy placemat, it is just the right size for that… I’d just have to make some matching ones! RED is supposed to induce appetite. Wait… I’m trying to lose weight so scrap that idea!

Experiment #1 Bobbin Sewing

Experiment #1 Bobbin Sewing

This is the first of many experiments from “Exploring Textile Arts” that I am working on for the month of June 2008 for Jen’s Challenge. It uses Decorative Bobbin Sewing. (pg 88) The point behind this style of sewing is to use thicker fancy and metallic threads that ordinarily wouldn’t go through the eye of a needle. You put the fancy thread on the bobbin and sew from the bottom. I don’t actually have any of these fancy threads and I am really in a USE WHAT YOU HAVE frame of mind, since I HAVE so much. But I do want to have quilted text in my new series of work so I need to practice and experiment with the best ways of sewing in words.

The text that is sewn several times is “Digging in the dark earth” and will be part of my just starting Journey Series, this one about gardening. I printed several cursive style fonts in different sizes on paper in REVERSE, then layered that paper on the top, a felt center, with the printed fabric on bottom. I then free-motion stitched this fabric sandwich using the bobbin method.

The GREEN thread words are the ones in this fashion. WOW! it is very, very hard to sew backwards cursive! I still need a LOT of practice in free motion anyway, but trying to write script is pretty hard.

The BLUE thread is when I gave up on the bobbin backwards style and flipped my fabric to the top. For one of these trials I wrote free-hand with a pen and then sewed over it. You can see the shadow of the ink, so if I end up with this method I will need to BUY some washout fabric pens or pencils… which I really need anyways to do some of the other quilting things I have planned. 

My final trial on this piece, I just sewed the words completely free-hand.(they go crooked at the end.) This has some possibilities, but I am most leaning towards the write with a washable pen and sew over that.

I ALSO have letters that my sewing machine can do for me, so that was my next trial. (But it doesn’t really fit with the experiments in the book, just something I need to try for this series.) Finally, I wrapped up with a few practice free-motion flowers.

So that is today’s experiment. I believe I will keep with about an 8×10 size for these experiments and put them together in a fabric journal with a printed copy of my blog notes on the process.

One more practice with more words. This time using the pen method I think I like best. Now to get some washable pens. But I still feel like it is WAY Messier than I want for the piece. Ultimately it will be blue thread on blue fabric and the sky behind a figure. The idea is for it to be background that you would need to work at to read, but that does NOT detract from the other parts of the piece. (Can you read it?)

ArtFest Flowers

Flowers for Swap

For my special Artfest friends I am creating some flowers for a swap. They are supposed to be some “before” flowers and some “after” flowers. So I thought dog/cat and paper/fabric combos. As I have gone from a cat lover to an avid dog fanatic (I do still love my cats, but I am not as obssessed about them as I am Charger) and I have gone from a mostly paper artist to a mostly fabric artist.

For the fabric flowers I am using a tutorial from Molly Chicken that I found from a podcast called Crafty Pod.

I picked Jen up yesterday and she helped me finish my flowers (thanks Jen!) and we will be leaving shortly for Port Townsend. EXCITING!!

Jen’s Challenge Week 7: Simplicity

simple hands

Simplicity is the property, condition, or quality of being simple or un-combined. It often denotes beauty, purity or clarity.”

I think of simplicity as very spiritual and for me the color that came instantly to mind was white. To simplify your life is very ZEN and reminiscent of monks or nuns that give up all the trappings of the world to seek a higher power. So I knew I wanted to create something that was very simple in color with a subject that has a peace about it. I also wanted to include circles, round edges have more simplicity than hard straight lines.

When I went to pick an image, I realized that I have a sketch on the work table that would be perfect. Originally, the plans for it were very colorful, layered and complex. So I decided to deconstruct the drawing to some main lines and do a simple single colored stitch. Although, I am not a big ‘pink person’, I am actually very thrilled with how this came out and might do a few more like this.

When you look at this piece, what do you see? I would like to know if the image is obvious to the new viewer, or if it is too abstracted or too subtle. Click here if you want to see the photo inspiration.

About 81/2″ by 12″ totaly including ribbon. Created by simple zigzag stitch on fabric with satin trim. For Jen’s Challenge Week 7 Simplicity As usual, a great challenge that I am glad to have accepted!

RIP Purse #1 (taken)

WIP_UFO2008014.jpg

So this lovely little purse project is something that I actually inherited in its current unfinished state. In some grab bag of fabric from somewhere, there was some yardage of this vintage embroidered fabric. Part of the folds of fabric turned out to be this already started purse. It has pleats and a hemmed top that is perfectly suited for a wooden handle of some kind. There are several pins in it still, holding areas that need to be finished after a handle is added, but other than that it is finished. It could use a lining too. Again it seemed like a really great find at the time, but I wouldn’t even use this purse if I did finish it, not my style anymore. I think this item has only been sitting around since 2003. email me if you think this is your style! perhaps you even have a wooden handle lying around just waiting for a bag to attach to it. I would love to see it go to a good home!

Thanks to Michelle…who makes great aprons over at  rustedrhubarb this bag will get new life… maybe as an apron?

RIP Clothing Pattern #1 (taken)

Where I share more documentation of my abandoned projects…. These are the ones that I have decided need to Rest in Pieces.

WIP_UFO2008022.jpgThis is an outfit that I started, mostly only cut-out, back in 1999! It was going to be my special outfit for the big 1999/2000 New Year’s Eve party! I never even started to sew. I think my machine was on the fritz or something. I have moved 3 times since I cut this out and have never finished or even progressed on the project. The saddest part, and what makes it truly ridiculous for me to still be packing it around, is that it is a SIZE that I currently cannot even begin to wear. (3 sizes too small at best) 

It is really pretty silver fabric with a same color floral pattern for the pants, and a sheer silver fabric for the blouse. It is a Vogue Pattern #1290. There is realistically no way I am ever going to make or wear this outfit. Even if it did fit, it is not a color that I can or want to wear anymore.

I think about keeping the fabric and putting it in my scrap bins that I use for fabric collage. But the silver is a very slippery silk-like fabric (who knows it might even be silk, but so long now since I bought it I don’t remember.) and these types of fabric are hard to work with in collage. Besides that, I do have extra of the same fabric already that didn’t get cut into pattern pieces.

So do you wear a size 10/12 Vogue? Do you look good in silver? Would you like to finish and wear this great outfit? send me an email and it can be yours for the low price of FREE!

So let’s see what is next on the chopping block!

Fiber Favorites

Sewing: I like to sew, I love fabric and make quilts, dolls and other fiber art. Here are some links for buying and using fabric.

http://www.threadbared.com/ A fun site that shows old patterns and all things weird re: clothing

Fabric: quilts, dolls, fabric books

AADA Artist Doll Gallery The Academy of American Doll Artist Foundation, Inc. Continue reading

Step by step work in progress pet portrait

Step by step making a dog protrait for EBSQ Pet Swap.

Work in Progress…..
 Working with a photo to create a dog portrait

 step one making a pattern from the photo

 Next: adding bits of fabric to the background with the pattern

 a jump in time, with more fabric added

 getting close to done with the piecing part of the project, still to come quilting and embellishment

Selecting the background…
Plain Brown or tan simple background…
dibbybackground02

OR Landscape style with blue on left

dibbybackground01

OR portrait style with more blue on top
dibbybackground04

Final Product
2007WIPfabricart_april004